

Do It Yourself Castle Cake
You can use your imagination to create your perfect castle cake. I will outline how I made my castle cake but remember you can change the colors, flowers and design any way you want. This is fun for princess parties, engagement parties, and other special occasions. The great thing is the cost is minimal and it looks tea-riffic!
To Make this:
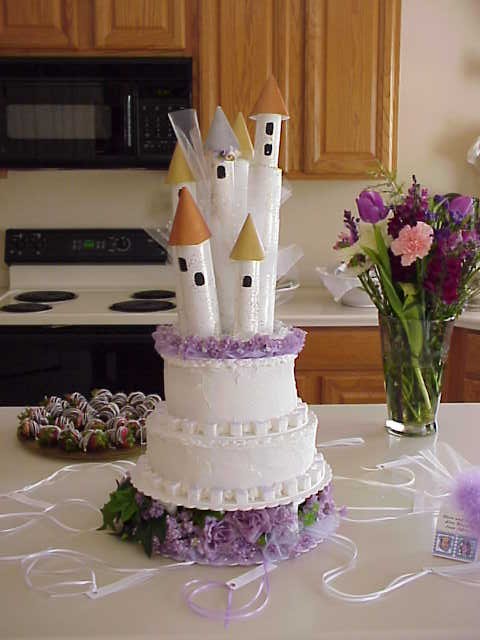
I collected 4 new empty toilet paper rolls, 5 new empty paper towel rolls, lavender tulle – the pre cut circles, black paint, white paint, white sparkly glitter, bronze paint, gold paint, paint brushes silk flowers – small frilly purple ones and purple roses along with some shiny little white roses and some little white shiny individual tiny roses, a string of green ivy, Light purple wired ribbon 2 Wilton plastic white 12” cake plates, 2 Wilton 8” plastic cake plates, and 4 white small Wilton columns. You will also need glue. I like heavy duty fabric glue in the bottle. The edible part of this is the two layers of cake, frosting, white sparkly edible sprinkles, and sugar cubes.
Castle Topper:
Cut paper towel rolls and toilet paper rolls to desired height, paint with white paint (you may need more than one coat) sprinkle with sparkly glitter before it dries. After this dries use black paint to make windows. Make sure to shake off excess glitter so it doesn’t get on the cake. Use leftover paper to form cone shapes, paint with gold and bronze paint, let dry. Make turrets out of the painted rolls, combine and glue as desired, top with painted cones. Cut, fold and glue purple ribbon to the edge of the 8 inch plate. Glue on turrets, then glue flowers (you can cut apart flowers and trim leaves if needed) cover the rest of the 8” plate. Finish off the topper by gluing the tulle in as needed to fill gaps and create the fairy like look of the castle.
Cake:
You will need four 10” white cakes or two 10” and two 8 inch. If you use the four 10” you will need to trim two of them down to fit on the 8 inch plate. See directions on cake packages to actually make and bake the cakes.
The bottom floral arrangement:
Cut, fold and glue purple ribbon to the edge of the 8 inch plate. Attach columns (you can glue these on for stability). Make a ring of paper to go in the middle of the 12” plate out of paper to minimize the number of flowers you will need to use in decorating the plate. Glue flowers (you can cut apart flowers and trim leaves if needed) cover the edges of the 12” plate while weaving the string of green ivy in between flowers. Put the 2nd 12” plate on the top of the columns, and finish gluing flowers and tulle into open spaces. Let dry.
Cake parts:
Remove the top 12” plastic cake plate from floral arrangement. Frost per cake directions the two 10” cakes. Sprinkle with edible glitter. Use frosting to glue the sugar cubes around the edge of the cake. Take the other two cakes and cut down to size to fit it and more sugar cubes around the 8” plate. Follow the same procedure to create the second layer of cake. You can also do this without the 2nd 8” plate but you will have to frost and stack the 8” cake on the 10”cake once it has been placed on the columns. Concentrate on stable stacking if you do this.
Assembly:
Assemble the cake where you are going to serve it from. The less you have to move the better. Place the 12” cake plate with the frosted cake onto the columns. Add the 8” cake, then the topper. You can use cake pulls around the cake if you desire. We will talk about cake pulls next time.
Happy Creating!